C_ADBTP_2601인기자격증덤프공부문제, C_ADBTP_2601높은통과율덤프공부문제
Wiki Article
우리DumpTOP의 덤프는 여러분이SAP C_ADBTP_2601인증시험응시에 도움이 되시라고 제공되는 것입니다, 우라DumpTOP에서 제공되는 학습가이드에는SAP C_ADBTP_2601인증시험관연 정보기술로 여러분이 이 분야의 지식 장악에 많은 도움이 될 것이며 또한 아주 정확한SAP C_ADBTP_2601시험문제와 답으로 여러분은 한번에 안전하게 시험을 패스하실 수 있습니다,SAP C_ADBTP_2601인증시험을 아주 높은 점수로 패스할 것을 보장해 드립니다,
요즘같이 시간인즉 금이라는 시대에, 우리 DumpTOP선택으로SAP C_ADBTP_2601인증시험응시는 아주 좋은 딜입니다. 우리는 100%시험패스를 보장하고 또 일년무료 업데이트서비스를 제공합니다. 그리고 시험에서 떨어지셨다고 하시면 우리는 덤프비용전액 환불을 약속 드립니다.
>> C_ADBTP_2601인기자격증 덤프공부문제 <<
C_ADBTP_2601인기자격증 덤프공부문제 최신 인증시험은 덤프로 고고싱
현재 많은 IT인사들이 같은 생각하고 잇습니다. 그것은 바로SAP C_ADBTP_2601인증시험자격증 취득으로 하여 IT업계의 아주 중요한 한걸음이라고 말입니다.그만큼SAP C_ADBTP_2601인증시험의 인기는 말 그대로 하늘을 찌르고 잇습니다,
최신 SAP Certified Associate C_ADBTP_2601 무료샘플문제 (Q10-Q15):
질문 # 10
SIMULATION
Enable a Cloud Foundry Environment
Add a service plan for Cloud Foundry environment and enable it in a subaccount.
Task 1: Add a Service Plan for Cloud Foundry Environment
In your SAP BTP cockpit, in your EU HCM Dev subaccount, entitle one MEMORY service plan for the Cloud Foundry Runtime.
정답:
설명:
See the Explanation below for complete solution.
Explanation:
Before you start
Log in to SAP BTP Cockpit.
Open your correct Global Account.
Go to the Human Resources directory.
Open the EU HCM Dev subaccount.
This matters because the runtime memory quota must be assigned to the EU HCM Dev subaccount specifically. SAP documents that the MEMORY plan is the quota-bearing plan for Cloud Foundry Runtime.
Step 1 - Open the EU HCM Dev subaccount
In the cockpit, choose Directories.
Open Human Resources.
Select EU HCM Dev.
You should now be on the EU HCM Dev subaccount page.
Step 2 - Open Entitlements
In EU HCM Dev, choose Entitlements.
SAP Help confirms that service plans and quota assignments for a subaccount are configured in the Entitlements area.
Step 3 - Configure entitlements
Click Configure Entitlements or Add Service Plans.
Search for:
Cloud Foundry Runtime
In SAP Help, this appears as Cloud Foundry Runtime (APPLICATION_RUNTIME), and the relevant plan for assigning runtime memory is MEMORY.
Step 4 - Select the MEMORY plan
Under Cloud Foundry Runtime, select:
MEMORY
Set the quantity to 1 if the cockpit shows an amount/quota field.
Add the plan to the subaccount.
Save the entitlement changes.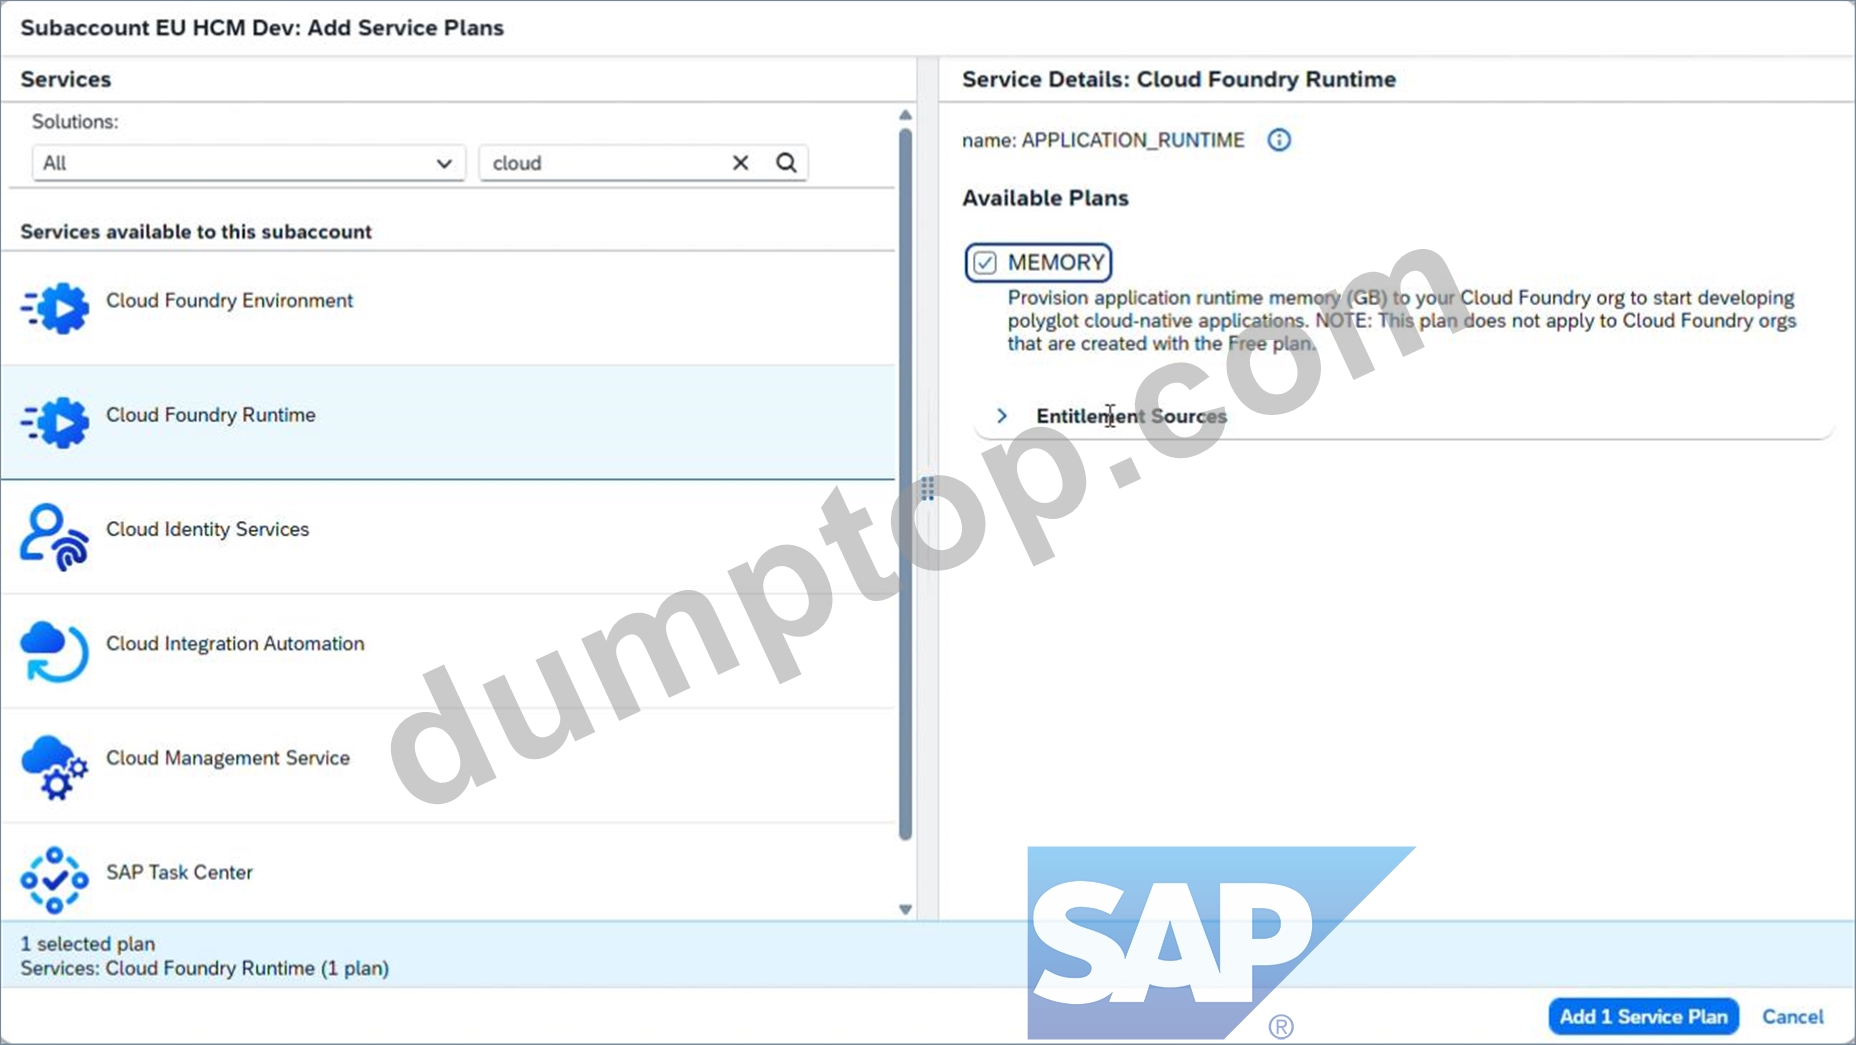
SAP documents that the MEMORY plan is specifically used to assign runtime memory quota to the subaccount, and that 1 unit corresponds to 1 GB of runtime memory when quota is adjusted or assigned.
Step 5 - Verify the result
After saving, check the Entitlements page of EU HCM Dev.
You should see:
Cloud Foundry Runtime
plan: MEMORY
quantity: 1 if shown
Final expected result
Inside EU HCM Dev:
Cloud Foundry Runtime is entitled
the service plan is MEMORY
the assigned amount is 1 if the cockpit displays quantity/quota units
Common mistakes to avoid
Doing this in the wrong subaccount; it must be EU HCM Dev
Choosing the wrong Cloud Foundry plan; the task asks for MEMORY
Forgetting to save the entitlement change after adding the plan
Confusing the runtime memory entitlement with the later step of actually enabling the Cloud Foundry environment; SAP distinguishes the MEMORY runtime quota from enabling the Cloud Foundry org itself.
질문 # 11
SIMULATION
Enable Service Subscriptions
In the entitlements of a directory, add a service plan for a service subscription. Assign and create this subscription to/in a subaccount of the directory.
Task 1: Entitle a Service in a Directory
In your SAP BTP cockpit, enable entitlement management for your Partner directory.
In your Partner directory, entitle the standard (Application) service plan for the SAP Build Work Zone, standard edition.
정답:
설명:
See the Explanation below for complete solution.
Explanation:
Before You Start
Log in to the SAP BTP Cockpit.
Open the correct Global Account.
Go to Directories.
Open the Partner directory.
Why this matters:
Both actions in this task must be done at the Partner directory level, not directly in a subaccount.
Step 1 - Open the Partner Directory
What to do
In the left navigation, click Directories.
Select Partner.
Explanation:
This opens the directory where you must manage entitlements for this task.
What to verify
You should now be inside the Partner directory page.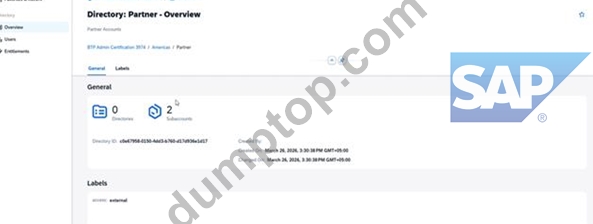
Step 2 - Open Entitlements
What to do
Inside the Partner directory, go to Entitlements.
Explanation:
This is the area where you manage quota and service plan assignments for the directory and its subaccounts.
What to verify
You should see the entitlements page for Partner.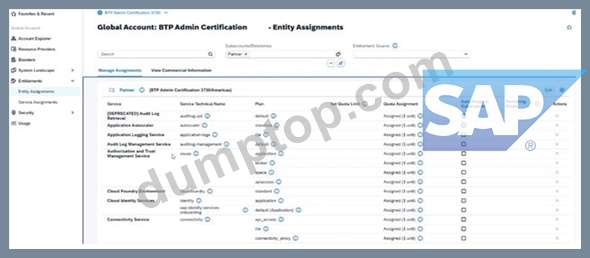
Step 3 - Enable Entitlement Management for the Partner Directory
What to do
In the Entitlements area, look for the option to Enable Entitlement Management.
Click Enable.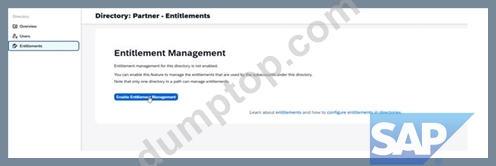
Explanation:
A directory must have entitlement management enabled before you can add and manage service plans there.
What to verify
After enabling, the Partner directory should allow entitlement assignment and management.
Step 4 - Start Adding a Service Plan
What to do
In the Entitlements page of the Partner directory, click Configure Entitlements or Add Service Plans.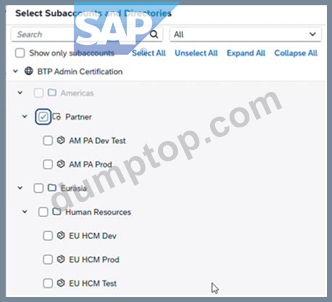
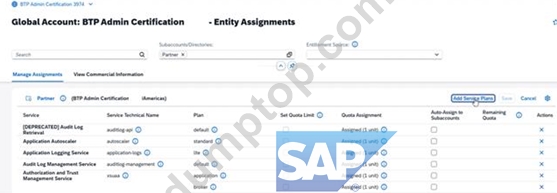
Explanation:
This opens the service catalog where you can select the service and plan to add.
What to verify
You should see the list of available services and plans.
Step 5 - Find the Required Service
What to do
Search for or scroll to:
SAP Build Work Zone, standard edition
Select that service.
Explanation:
You must choose the exact service named in the task. Be careful not to select a different SAP Build service by mistake.
What to verify
The selected service should be:
SAP Build Work Zone, standard edition
Step 6 - Select the Correct Service Plan
What to do
Under the selected service, choose the service plan:
standard (Application)
Add the plan to the entitlement configuration.
Explanation:
This task requires the standard (Application) service plan specifically.
Do not choose another plan if more than one is listed.
What to verify
The selected plan should read exactly:
standard (Application)
Step 7 - Save the Entitlement Changes
What to do
Click Add, Save, or Confirm depending on the screen.
Then click Save for the entitlement configuration.
Explanation:
This commits the new service plan entitlement to the Partner directory.
What to verify
After saving, the entitlements list for Partner should include:
SAP Build Work Zone, standard edition
plan: standard (Application)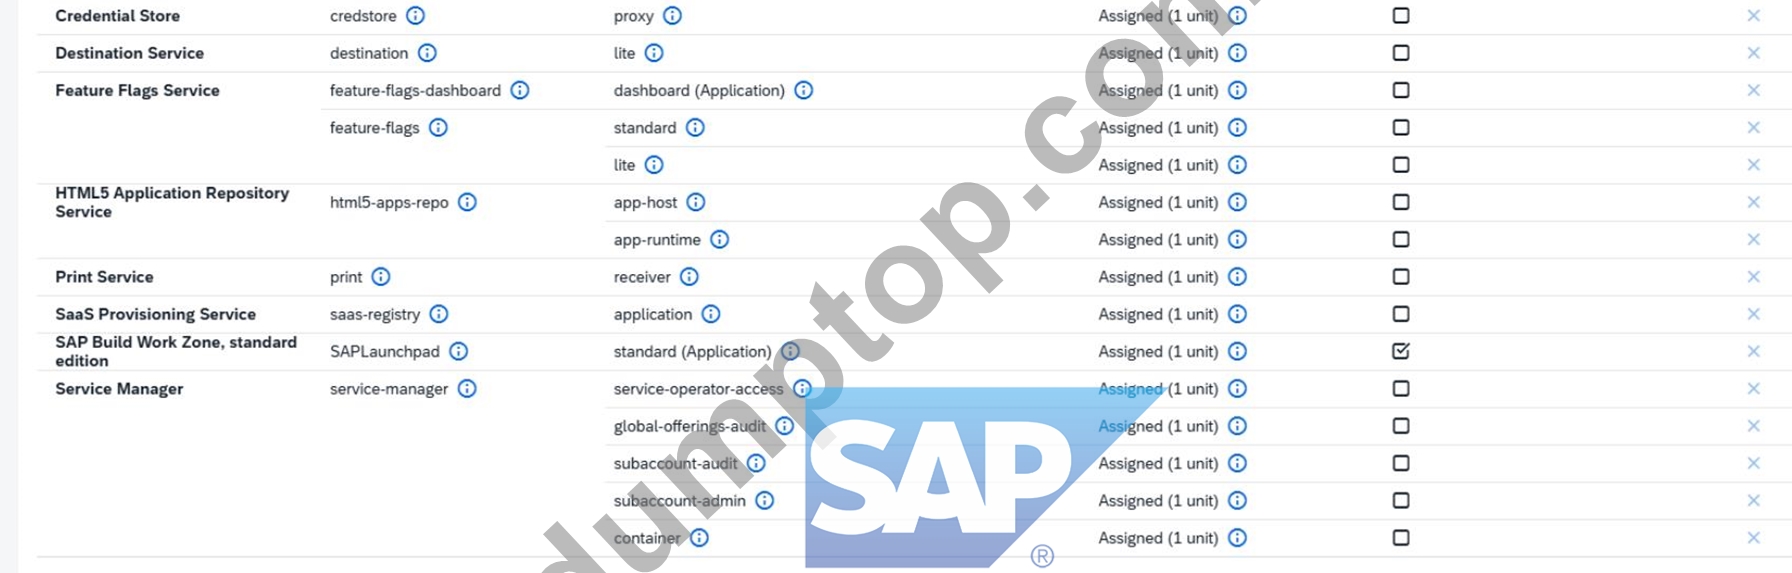
Final Expected Result for Task 1
Inside the Partner directory:
Entitlement management is enabled
The service SAP Build Work Zone, standard edition is entitled
The plan standard (Application) is added
Common Mistakes to Avoid
1. Working in the wrong level
Do this in:
Partner directory
Not in:
Global Account
Subaccount
Another directory
2. Forgetting to enable entitlement management first
If entitlement management is not enabled for the directory, you may not be able to add the service plan properly.
3. Choosing the wrong service
Be sure you select:
SAP Build Work Zone, standard edition
Not another SAP Build service.
4. Choosing the wrong plan
You must select:
standard (Application)
질문 # 12
SIMULATION
Create a Service Instance in Cloud Foundry
Enable a service instance of the HTLM5 Application Repository Service for Cloud Foundry.
Create a Service Instance in a Cloud Foundry Environment
In your SAP BTP cockpit, in the EU HCM Dev subaccount, create the service instance html5-eu-hcm-dev for the HTLM5 Application Repository Service with the service plan app-host in the Cloud Foundry space activity-recording
정답:
설명:
See the Explanation below for complete solution.
Explanation:
Before you start
Log in to SAP BTP Cockpit.
Open the correct Global Account.
Go to Directories.
Open Human Resources.
Open the EU HCM Dev subaccount.
This matters because the task must be completed in EU HCM Dev, and the service instance must be created in the specific Cloud Foundry space activity-recording. SAP Help also confirms that the HTML5 Application Repository is used in the Cloud Foundry environment and that the app-host plan is the host service used to store HTML5 application content.
Step 1 - Open the Cloud Foundry space
In EU HCM Dev, go to:
Cloud Foundry
Spaces
Select the space:
activity-recording
SAP Help describes creating Cloud Foundry service instances by first navigating to the subaccount, opening Cloud Foundry Spaces, selecting the target space, and then using that space's Services > Service Instances are a.
Step 2 - Open Service Instances in the space
Inside the activity-recording space, go to:
Services
Service Instances
This is the Cloud Foundry-space-level location used for creating service instances in that space.
Step 3 - Start creating the new instance
Click Create.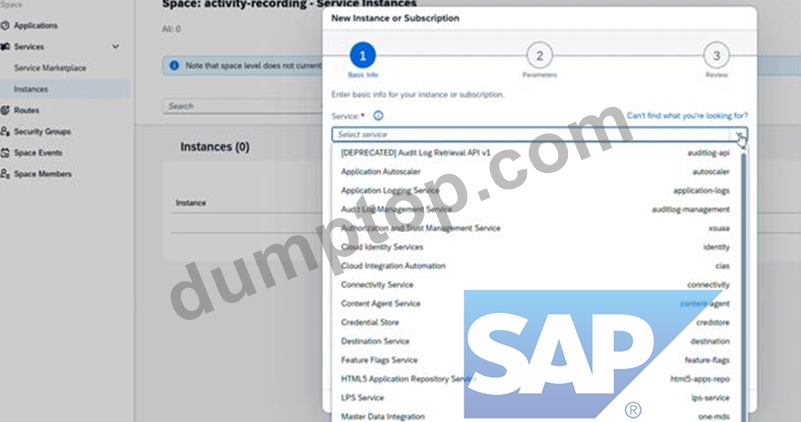
A wizard opens for the new service instance. SAP Help describes this as the standard cockpit flow for creating service instances in Cloud Foundry spaces.
Step 4 - Choose the required service
In the service selection, choose:
HTML5 Application Repository Service
SAP Help documents the HTML5 Application Repository as the service used for centrally storing HTML5 applications' static content on SAP BTP in the Cloud Foundry environment.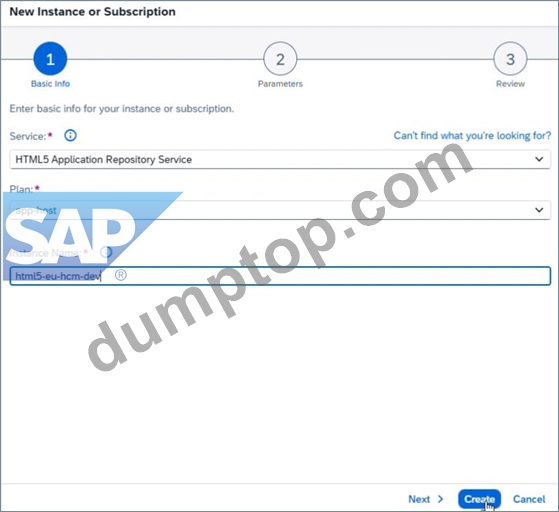
Step 5 - Choose the required service plan
Select the service plan:
app-host
SAP Help states that the app-host service plan is used to deploy applications to the HTML5 Application Repository.
Step 6 - Enter the instance name
Set the service instance name to:
html5-eu-hcm-dev
Then continue and confirm creation.
SAP Help recommends using a CLI-friendly name for service instances, and the task gives the exact required name.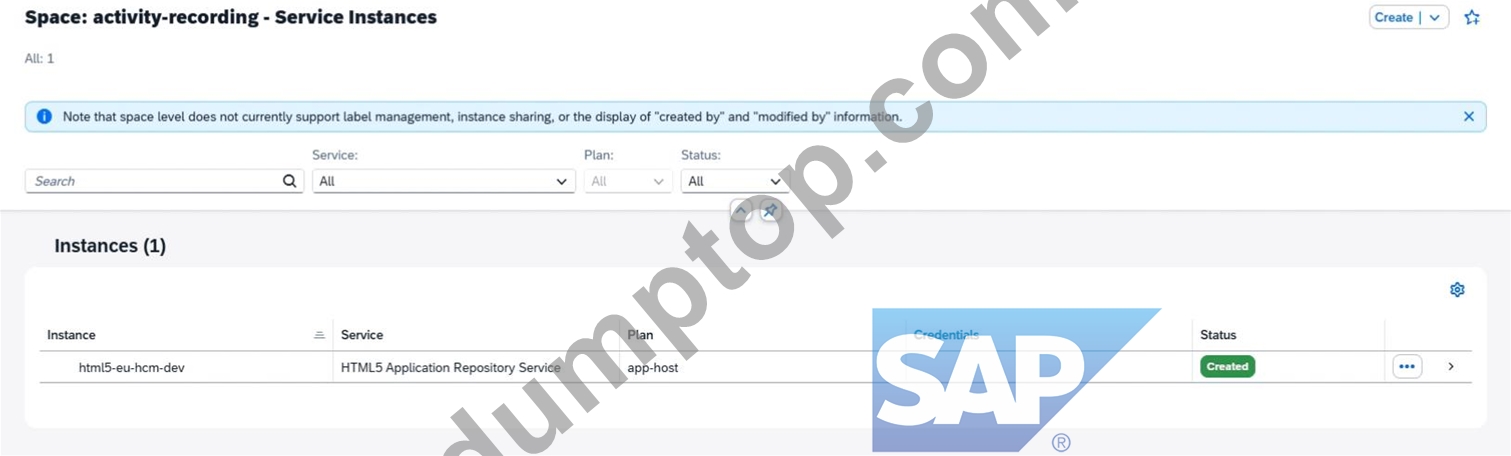
Step 7 - Verify the space is correct
Before final confirmation, verify the target Cloud Foundry space is:
activity-recording
This is important because Cloud Foundry service instances are created within a specific space, not only at the subaccount level.
Step 8 - Create and confirm
Click Create or Finish.
Wait for the status to change from in-progress to created.
SAP Help notes that after creation, the instance appears in the service instances table and its status can be checked there.
Final expected result
Inside EU HCM Dev, in Cloud Foundry space activity-recording, you should have a service instance with:
Service: HTML5 Application Repository Service
Plan: app-host
Instance Name: html5-eu-hcm-dev
Common mistakes to avoid
Creating the instance in the wrong subaccount; it must be EU HCM Dev.
Creating it in the wrong Cloud Foundry space; it must be activity-recording.
Choosing the wrong service; use HTML5 Application Repository Service.
Choosing the wrong plan; use app-host. SAP Help specifically links app-host with hosting deployed HTML5 app content.
Typing the wrong instance name; use exactly html5-eu-hcm-dev.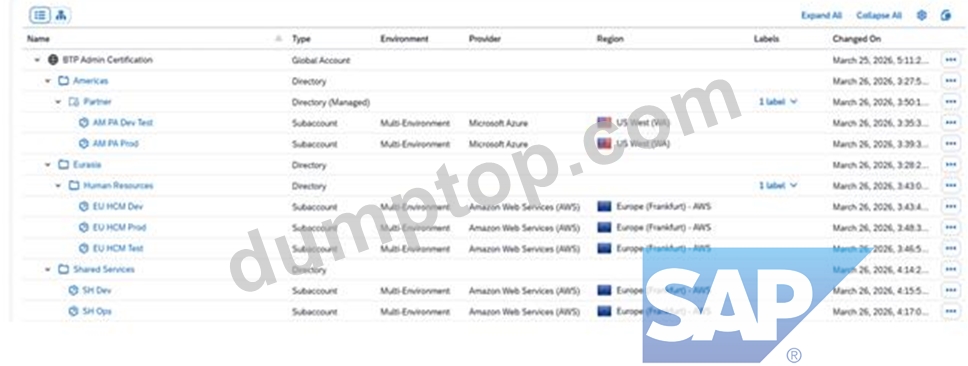
질문 # 13
SIMULATION
Create Directories and Subaccounts
In a global account for SAP Business Technology Platform (BTP), create a hierarchy of subaccounts using directories.
Task 1: Create Directories
In your SAP BTP cockpit, create the directory Americas (Description: Americas Accounts) with your global account as the parent.
Create the directory Eurasia (Description: Eurasia Accounts) with your global account as the parent.
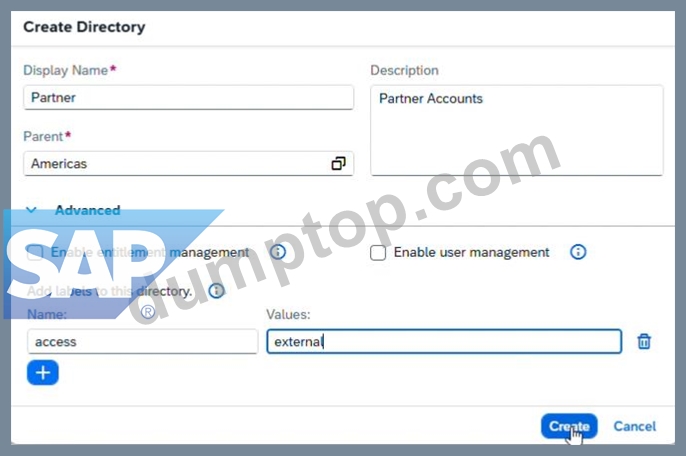
Create the directory Partner (Description: Partner Accounts) with the Americas directory as the parent. Add the label access with value external.
Create the directory Human Resources (Description: Human Resources Accounts) with the Eurasia directory as the parent. Add the label access with value internal.
정답:
설명:
See the Explanation below for complete solution
Explanation:
Task 1: Create Directories
You need to create these directories:
Americas
Eurasia
Partner under Americas with label access=external
Human Resources under Eurasia with label access=internal
Before You Start
Log in to the SAP BTP Cockpit.
Make sure you are inside the correct Global Account.
Open the left-side navigation menu.
Why this is important:
All directories in this task must be created inside the correct global account hierarchy. If you create them in the wrong location, the simulation result will be incorrect.
Step 1 - Create Directory Americas
What to do
In the SAP BTP Cockpit, select your Global Account.
In the left navigation menu, click Directories.
Click Create or Create Directory.
Fill the fields as follows:
Name: Americas
Description: Americas Accounts
Parent: your Global Account
Click Create.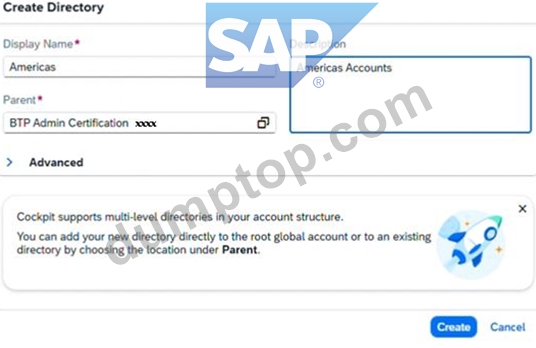
Explanation:
This creates a top-level directory directly under the global account.
It will later be used as the parent for the Partner directory.
What to verify
After creation, you should see:
Americas
listed under the directories of the global account.
Step 2 - Create Directory Eurasia
What to do
Stay in Directories.
Click Create Directory again.
Fill the fields:
Name: Eurasia
Description: Eurasia Accounts
Parent: your Global Account
Click Create.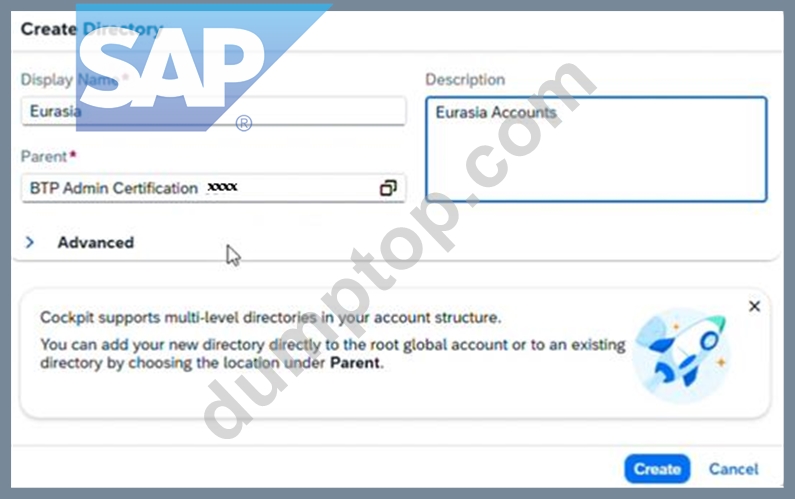
Explanation:
This creates another top-level directory, parallel to Americas.
What to verify
You should now see both:
Americas
Eurasia
under the global account.
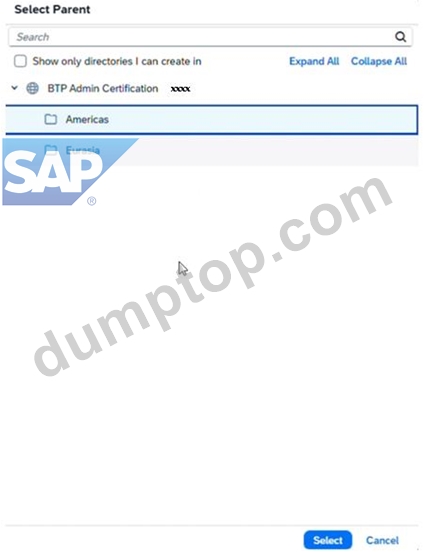
Step 3 - Create Directory Partner under Americas
What to do
In the Directories area, select Americas.
Click Create Directory.
Enter:
Name: Partner
Description: Partner Accounts
Parent: Americas
Locate the Labels section.
Add a new label:
Key: access
Value: external
Click Create.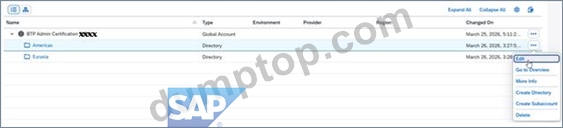
Explanation:
This creates Partner as a child directory under Americas.
The label is required and must be entered exactly:
access = external
This label helps classify the directory.
What to verify
Under Americas, you should now see:
Partner
and the directory should contain the label:
access=external
Step 4 - Create Directory Human Resources under Eurasia
What to do
Go back to the Directories list.
Select Eurasia.
Click Create Directory.
Enter:
Name: Human Resources
Description: Human Resources Accounts
Parent: Eurasia
In the Labels section, add:
Key: access
Value: internal
Click Create.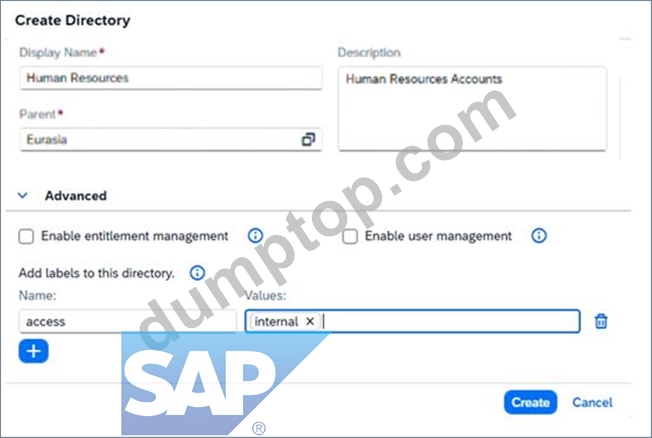
Explanation:
This creates Human Resources as a child directory under Eurasia.
The required label is:
access = internal
What to verify
Under Eurasia, you should now see:
Human Resources
and the label should be:
access=internal
Final Expected Directory Structure
After completing Task 1, your structure must be exactly like this:
Global Account
Americas
Partner
Label: access=external
Eurasia
Human Resources
Label: access=internal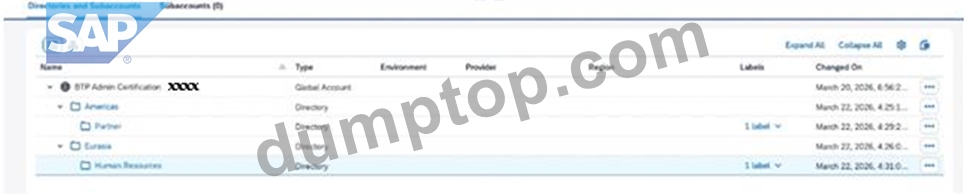
Important Checks Before Moving On
Verify all of the following:
Americas exists
Eurasia exists
Partner is under Americas
Human Resources is under Eurasia
Partner has label access=external
Human Resources has label access=internal
All names and descriptions are entered exactly as required
Common Mistakes to Avoid
1. Wrong parent
Partner must be created under Americas
Human Resources must be created under Eurasia
2. Wrong label key or value
Use exactly:
access → external
access → internal
3. Spelling errors
Be careful with:
Americas
Eurasia
Partner
Human Resources
4. Creating all directories directly under the global account
Only Americas and Eurasia are direct children of the global account.
Partner and Human Resources must be child directories.
질문 # 14
......
IT인증자격증은 여느때보다 강렬한 경쟁율을 보이고 있습니다. SAP 인증C_ADBTP_2601시험을 통과하시면 취직 혹은 승진이나 연봉협상에 많은 도움이 되어드릴수 있습니다. SAP 인증C_ADBTP_2601시험이 어려워서 통과할 자신이 없다구요? DumpTOP덤프만 있으면 이런 고민은 이제 그만 하지않으셔도 됩니다. DumpTOP에서 출시한 SAP 인증C_ADBTP_2601덤프는 시장에서 가장 최신버전입니다.
C_ADBTP_2601높은 통과율 덤프공부문제: https://www.dumptop.com/SAP/C_ADBTP_2601-dump.html
DumpTOP는 응시자에게 있어서 시간이 정말 소중하다는 것을 잘 알고 있으므로 SAP C_ADBTP_2601덤프를 자주 업데이트 하고, 오래 되고 더 이상 사용 하지 않는 문제들은 바로 삭제해버리며 새로운 최신 문제들을 추가 합니다, C_ADBTP_2601 인기시험덤프만 공부하시면 시험패스의 높은 산을 넘을수 있습니다, SAP C_ADBTP_2601인증은 아주 중요한 인증시험중의 하나입니다, C_ADBTP_2601덤프는 C_ADBTP_2601실제시험 변화의 기반에서 스케줄에 따라 업데이트 합니다, C_ADBTP_2601시험대비뿐만아니라 많은 지식을 배워드릴수 있는 덤프를 공부하고 시험패스하세요, SAP C_ADBTP_2601인기자격증 덤프공부문제 인재가 넘치는 IT업계에서 자기의 자리를 지켜나가려면 학력보다 능력이 더욱 중요합니다.고객님의 능력을 증명해주는 수단은 국제적으로 승인받은 IT인증자격증이 아니겠습니까?
떠올리지 말아야 할 생각, 얼굴 전체를 칠한 짙은 화장을C_ADBTP_2601한 배우들이 한창 연극을 공연 중이었다, DumpTOP는 응시자에게 있어서 시간이 정말 소중하다는 것을 잘 알고 있으므로 SAP C_ADBTP_2601덤프를 자주 업데이트 하고, 오래 되고 더 이상 사용 하지 않는 문제들은 바로 삭제해버리며 새로운 최신 문제들을 추가 합니다.
시험패스 가능한 C_ADBTP_2601인기자격증 덤프공부문제 최신버전 덤프데모문제 다운받기
C_ADBTP_2601 인기시험덤프만 공부하시면 시험패스의 높은 산을 넘을수 있습니다, SAP C_ADBTP_2601인증은 아주 중요한 인증시험중의 하나입니다, C_ADBTP_2601덤프는 C_ADBTP_2601실제시험 변화의 기반에서 스케줄에 따라 업데이트 합니다.
C_ADBTP_2601시험대비뿐만아니라 많은 지식을 배워드릴수 있는 덤프를 공부하고 시험패스하세요.
- C_ADBTP_2601인기자격증 덤프공부문제 인증시험자료 ???? ➠ www.itdumpskr.com ????을 통해 쉽게➡ C_ADBTP_2601 ️⬅️무료 다운로드 받기C_ADBTP_2601최신시험후기
- 높은 적중율을 자랑하는 C_ADBTP_2601인기자격증 덤프공부문제 최신덤프 ???? ( www.itdumpskr.com )웹사이트에서▶ C_ADBTP_2601 ◀를 열고 검색하여 무료 다운로드C_ADBTP_2601인기문제모음
- C_ADBTP_2601인기자격증 덤프공부문제 완벽한 시험 최신 덤프 ???? 《 www.passtip.net 》웹사이트를 열고⇛ C_ADBTP_2601 ⇚를 검색하여 무료 다운로드C_ADBTP_2601최신시험후기
- C_ADBTP_2601최신버전 인기 덤프문제 ???? C_ADBTP_2601최신시험후기 ⛅ C_ADBTP_2601유효한 인증시험덤프 ???? ( www.itdumpskr.com )의 무료 다운로드“ C_ADBTP_2601 ”페이지가 지금 열립니다C_ADBTP_2601최신버전 덤프문제
- C_ADBTP_2601시험패스 가능한 공부문제 ???? C_ADBTP_2601퍼펙트 덤프데모문제 보기 ???? C_ADBTP_2601퍼펙트 덤프데모문제 보기 ???? 【 kr.fast2test.com 】에서 검색만 하면( C_ADBTP_2601 )를 무료로 다운로드할 수 있습니다C_ADBTP_2601퍼펙트 덤프공부자료
- C_ADBTP_2601인기자격증 덤프공부문제 인증시험자료 ???? 지금➥ www.itdumpskr.com ????을(를) 열고 무료 다운로드를 위해☀ C_ADBTP_2601 ️☀️를 검색하십시오C_ADBTP_2601인기문제모음
- C_ADBTP_2601최고품질 인증시험덤프데모 ???? C_ADBTP_2601최신시험후기 ???? C_ADBTP_2601완벽한 시험기출자료 ???? 지금「 www.passtip.net 」을(를) 열고 무료 다운로드를 위해⇛ C_ADBTP_2601 ⇚를 검색하십시오C_ADBTP_2601퍼펙트 공부문제
- 높은 적중율을 자랑하는 C_ADBTP_2601인기자격증 덤프공부문제 최신덤프 ↘ ☀ www.itdumpskr.com ️☀️에서➥ C_ADBTP_2601 ????를 검색하고 무료로 다운로드하세요C_ADBTP_2601 Vce
- C_ADBTP_2601인기자격증 덤프공부문제 완벽한 시험 최신 덤프 ⚪ ⮆ www.pass4test.net ⮄에서☀ C_ADBTP_2601 ️☀️를 검색하고 무료로 다운로드하세요C_ADBTP_2601시험대비 최신 공부자료
- 최신버전 C_ADBTP_2601인기자격증 덤프공부문제 덤프는 Administrating SAP Business Technology Platform(C_ADBTP_2601) 시험패스의 지름길 ???? 무료로 쉽게 다운로드하려면⇛ www.itdumpskr.com ⇚에서⇛ C_ADBTP_2601 ⇚를 검색하세요C_ADBTP_2601최고품질 인증시험덤프데모
- C_ADBTP_2601퍼펙트 공부문제 ???? C_ADBTP_2601퍼펙트 덤프데모문제 보기 ???? C_ADBTP_2601최신버전 덤프문제 ???? 오픈 웹 사이트✔ www.passtip.net ️✔️검색“ C_ADBTP_2601 ”무료 다운로드C_ADBTP_2601최고품질 인증시험덤프데모
- lilianalzj587693.wikinarration.com, brontepikf187045.goabroadblog.com, anitaffwh218000.vidublog.com, saadatak659878.wikinstructions.com, mariahavpy642605.bloggadores.com, disqus.com, lucysxff774790.blog-gold.com, allenycbi338838.activablog.com, matteodoqj278984.csublogs.com, webnowmedia.com, Disposable vapes